You want an area of a page to show both standard banner ads and Content-Driven Native ads alternatively based on page views. This can be done in Google Ad Manager. Here, I discuss how to achieve this.
The following is complete code from banner-native-example.html.
<html>
<head>
<script async src="//www.googletagservices.com/tag/js/gpt.js"></script>
<script async src="//www.adrelevantis.com/pub/prebid.js"></script>
<script>
//Prebid.js and Google Ad Manager code
var googletag = googletag || {};
googletag.cmd = googletag.cmd || [];

var PREBID_TIMEOUT = 3000;
var FAILSAFE_TIMEOUT = 6000;

var pbjs = pbjs || {};
pbjs.que = pbjs.que || [];

function bidFunc(keywrds, cats)
{
  //Keywords and IAB Categories of the content are sent as bidder parameters
  pbjs.que.push(function() {
    pbjs.setBidderConfig({
      bidders: ['adrelevantis'],
      config: {
        ortb2: {
          site: {
            keywords: keywrds,
            ext: {
              data: {category: cats}
            }
          }
        }
      }
    });

    var adUnits = [
    {
      code: 'div-1',
      mediaTypes: {
        banner: {
          sizes: [[300, 600], [300, 250]]
        },
        native: {
          sendTargetingKeys: false,
          title: {
            required: true
          },
          image: {
            required: true
          },
          clickUrl: {
            required: true
          },
          sponsoredBy: {
            required: true
          }
        }
      },
      bids: [{
        bidder: 'adrelevantis',
        params: {
          placementId: 13144370,
          cpm: 1
        }
      }]
    }];

    googletag.cmd.push(function() {
      var slot1 = googletag.defineSlot('/21901351985/header-bid-tag-2', ['fluid', [300, 600], [300, 250]], 'div-1').addService(googletag.pubads());
      googletag.pubads().disableInitialLoad();
      googletag.pubads().enableSingleRequest();
      googletag.enableServices();
    });

    pbjs.addAdUnits(adUnits);
    pbjs.requestBids({
      bidsBackHandler: initAdserver,
      timeout: PREBID_TIMEOUT
    });
  });

  function initAdserver(bids) {
    if (pbjs.initAdserverSet) return;

    googletag.cmd.push(function() {
      pbjs.que.push(function() {
        pbjs.setTargetingForGPTAsync();
        googletag.pubads().refresh();
      });
    });

    pbjs.initAdserverSet = true;
  }

  setTimeout(function(bids) {
    initAdserver(bids);
  }, FAILSAFE_TIMEOUT);
};

bidFunc("Pets Dental Health,Pet,Pet dental", "/pets|/pets/cats");
</script>
</head>
  <body>
    <h2>Native Content-Driven Advertising Examples</h2>
    <div id='div-1' style='width: 30%; min-width: 300px; min-height: 250px;'>
      <script>
        googletag.cmd.push(function() { googletag.display('div-1'); });
      </script>
    </div>
  </body>
</html>
In the adUnits, you specify both banner and native as mediatypes. For banner, you specify the sizes of ads you want to display. In defineSlot function, you need to specify ‘fluid’ (for native ads) and sizes (for banners).
The rest of work is in Google Ad Manager. Let’s say you want to display a 300×250 banner and native square Content-Driven ads alternatively.
First, you need to define an ad unit. For sizes, you need to select ‘Fluid’ for native ads and possible banner sizes that you want the ad unit to display.
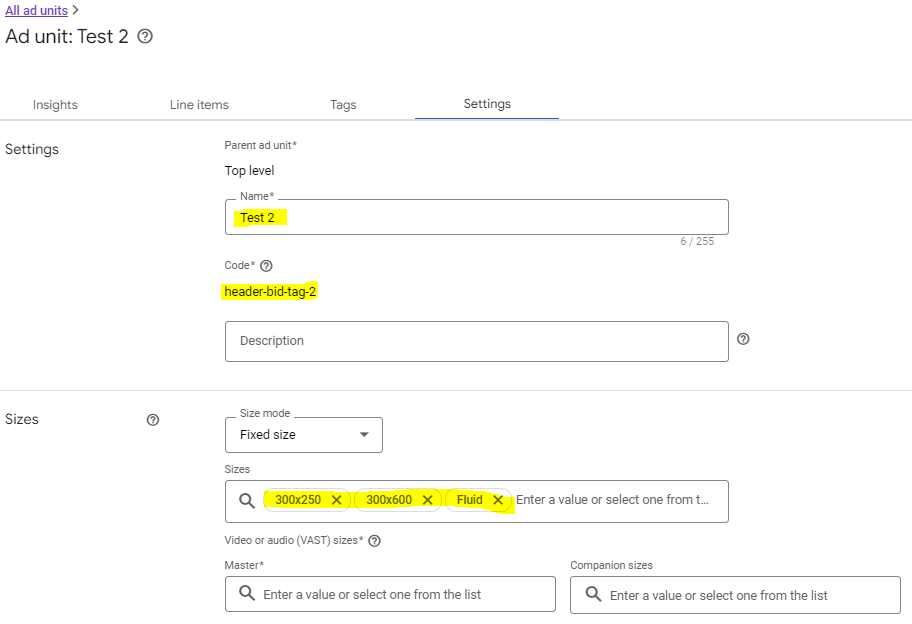
Then, you define a Native. Make sure it targets to the ad unit defined in the previous step (“Test 2” for this case).

You also need to define HTML and CSS of the native.

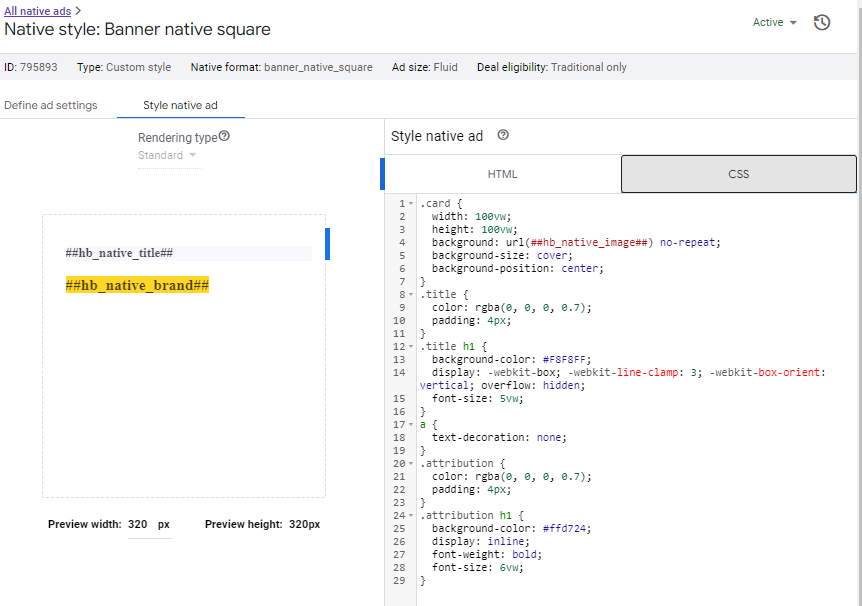
Here is the complete HTML code.
<a href="%%CLICK_URL_UNESC%%##hb_native_linkurl##" target="_blank" class="pb-click">
  <div class="card">
  	<div class="title">
    	<h1>##hb_native_title##</h1>
  	</div>
  	<div class="attribution">
    	<h1>##hb_native_brand##</h1>
  	</div>
	</div>
</a>
<script src="https://cdn.jsdelivr.net/npm/prebid-universal-creative@latest/dist/native-render.js"></script>
<script>
    var pbNativeTagData = {};
    pbNativeTagData.pubUrl = "%%PATTERN:url%%";
    pbNativeTagData.adId = "%%PATTERN:hb_adid%%";
    // if you're using 'Send All Bids' mode, you should use %%PATTERN:hb_adid_BIDDER%%
    pbNativeTagData.requestAllAssets = true;
    window.pbNativeTag.renderNativeAd(pbNativeTagData);
</script>
Here is the complete CSS code.
.card {
  width: 100vw;
  height: 100vw;
  background: url(##hb_native_image##) no-repeat;
  background-size: cover;
  background-position: center;
}
.title {
  color: rgba(0, 0, 0, 0.7);
  padding: 4px;
}
.title h1 {
  background-color: #F8F8FF;
  display: -webkit-box; -webkit-line-clamp: 3; -webkit-box-orient: vertical; overflow: hidden;
  font-size: 5vw;
}
a {
  text-decoration: none;
}
.attribution {
  color: rgba(0, 0, 0, 0.7);
  padding: 4px;
}
.attribution h1 {
  background-color: #ffd724;
  display: inline;
  font-weight: bold;
  font-size: 6vw;
}
Now, you can define your campaign Order and its line items.
You need to define a line item for your banner. Note the Expected creatives is 300×250.

Make sure you target to Inventory “Test 2”.

You also need to define a creative for this line item. For this case, the creative is the banner image, the click through, etc.
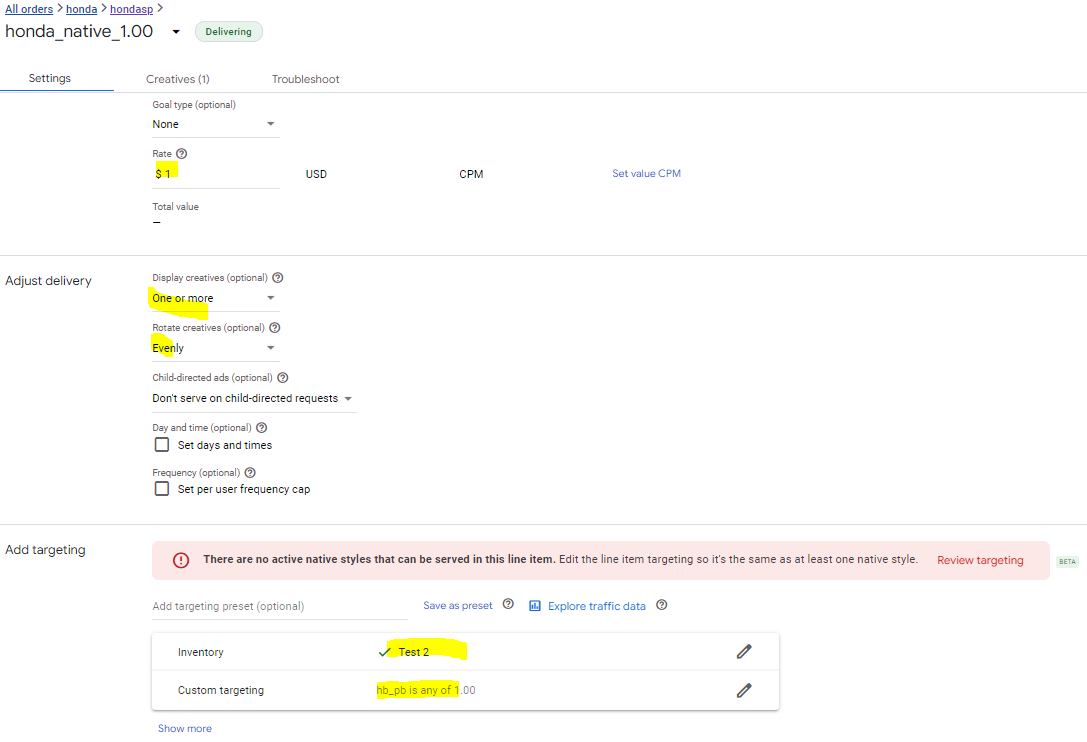
Now, you need to define a second line item for the native ads. Make sure select the previous defined native as Expected creatives (“banner_native_square” for this case).

Make sure select “Test 2” as Inventory targeting.
You are done.
You can click this link to see how it actually works. In general, the banner ad takes precedence. When its impressions are using up, the native ads kick in.
The next step is to move the code into your pages or integrate it with your code base.
Any questions? Please contact us at info@adrelevantis.com.
To understand what the Content-Driven Advertising is and how it works, please read the following posts:
