In the previous blogs (Part 1 and Part 2), I discussed how Content-Driven Native Ads work with our GAM tags. In this blog, I show you how to set up your GAM tags to work with Content-Driven Native Ads.
I assume that you use Prebid.js header bidding platform for your site. I presume you have a Google Ad Manager account and have basic understanding of it.
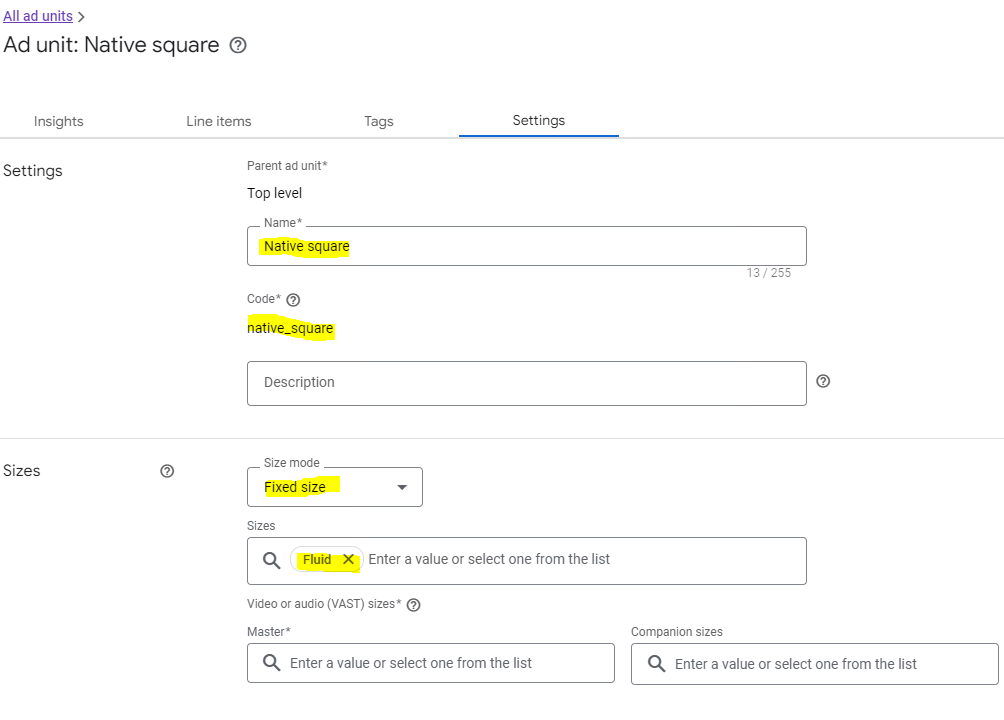
Let’s say you want to display a native ad to fit in a square area of your page.

In Ad units of GAM, add an ad unit as follows. Make sure select Size mode “Fixed size” and Sizes “Fluid”.
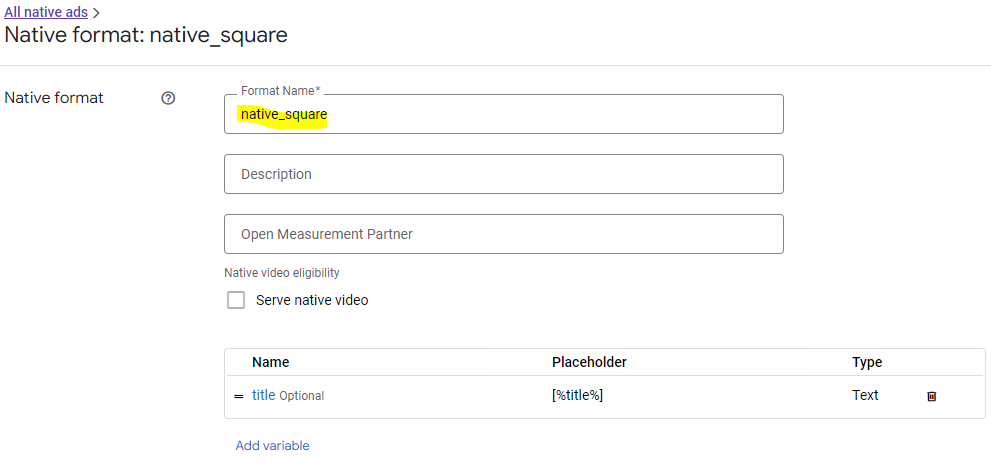
In Native of GAM, add a Native format.
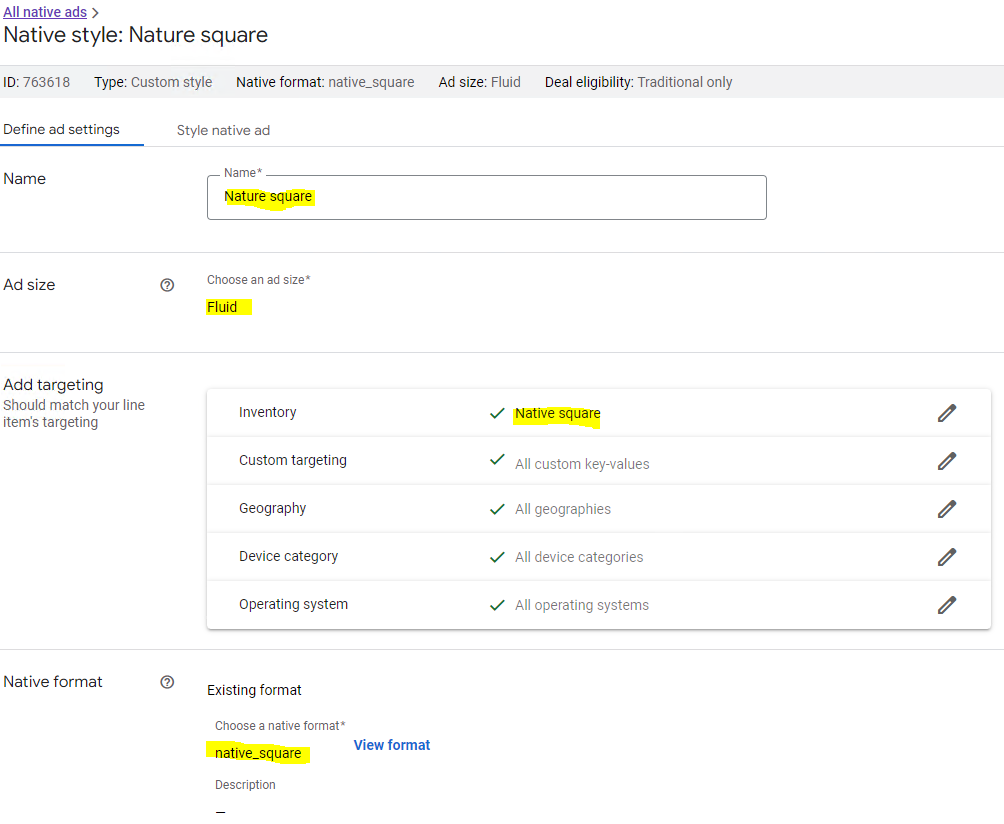
Add a Native style. Make sure choose “Fluid” as an ad size. Select “Native square” ad unit as targeting Inventory. Choose the “native_square” format defined previously.
Insert the following code in HTML and CSS of Style native ad tab, respectively.

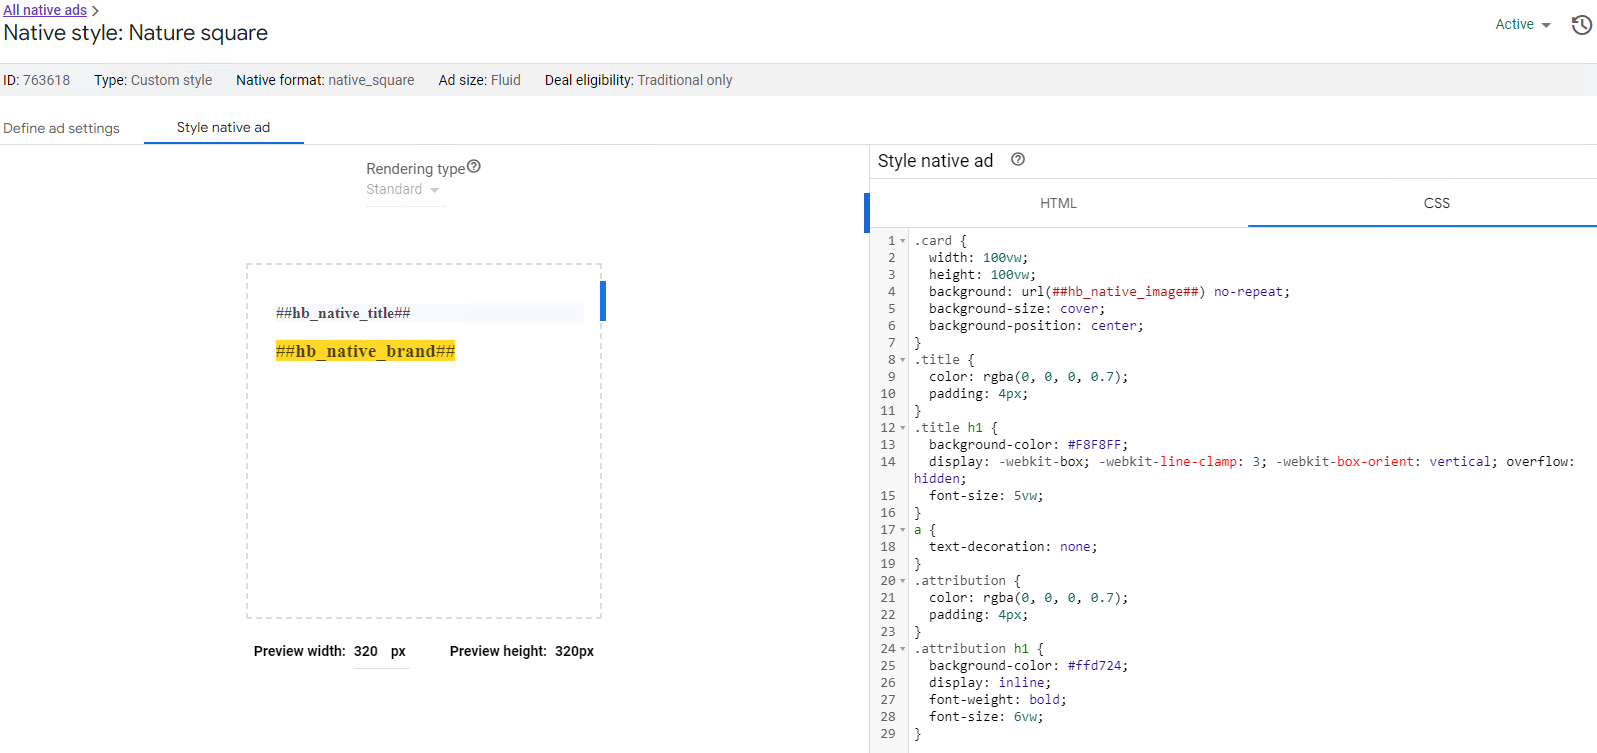
Here is the complete HTML code.
<a href="%%CLICK_URL_UNESC%%##hb_native_linkurl##" target="_blank" class="pb-click">
  <div class="card">
  	<div class="title">
    	<h1>##hb_native_title##</h1>
  	</div>
  	<div class="attribution">
    	<h1>##hb_native_brand##</h1>
  	</div>
	</div>
</a>
<script src="https://cdn.jsdelivr.net/npm/prebid-universal-creative@latest/dist/native-render.js"></script>
<script>
    var pbNativeTagData = {};
    pbNativeTagData.pubUrl = "%%PATTERN:url%%";
    pbNativeTagData.adId = "%%PATTERN:hb_adid%%";
    // if you're using 'Send All Bids' mode, you should use %%PATTERN:hb_adid_BIDDER%%
    pbNativeTagData.requestAllAssets = true;
    window.pbNativeTag.renderNativeAd(pbNativeTagData);
</script>
Here is the complete CSS code.
.card {
  width: 100vw;
  height: 100vw;
  background: url(##hb_native_image##) no-repeat;
  background-size: cover;
  background-position: center;
}
.title {
  color: rgba(0, 0, 0, 0.7);
  padding: 4px;
}
.title h1 {
  background-color: #F8F8FF;
  display: -webkit-box; -webkit-line-clamp: 3; -webkit-box-orient: vertical; overflow: hidden;
  font-size: 5vw;
}
a {
  text-decoration: none;
}
.attribution {
  color: rgba(0, 0, 0, 0.7);
  padding: 4px;
}
.attribution h1 {
  background-color: #ffd724;
  display: inline;
  font-weight: bold;
  font-size: 6vw;
}
In Creatives of GAM, create a creative named “Native square”. Make sure to choose the previously defined format “native_square” as Creative template. Select “Native” as Target ad unit size. And select “jsdelivr” as ad technology provider.

That finishes the definition of the Native Square ad. You can define other ad formats by following the same steps. The only difference is their HTML and CSS code.
For Native Nature format (ads cross the width of content section), the HTML code is

<a href="%%CLICK_URL_UNESC%%##hb_native_linkurl##" target="_blank" class="pb-click">
  <div class="sponsored-post">
  	<div class="thumbnail" style="background-image: url(##hb_native_image##);">
    </div>
  	<div class="content">
    	<h1>##hb_native_title##</h1>
    	<div class="attribution">##hb_native_brand##				</div>
  	</div>
	</div>
</a>
<script src="https://cdn.jsdelivr.net/npm/prebid-universal-creative@latest/dist/native-render.js"></script>
<script>
    var pbNativeTagData = {};
    pbNativeTagData.pubUrl = "%%PATTERN:url%%";
    pbNativeTagData.adId = "%%PATTERN:hb_adid%%";
    // if you're using 'Send All Bids' mode, you should use %%PATTERN:hb_adid_BIDDER%%
    pbNativeTagData.requestAllAssets = true;
    window.pbNativeTag.renderNativeAd(pbNativeTagData);
</script>
The CSS code is
.sponsored-post {
  background-color: #fffdeb;
  height: 15vw;
}

.content {
  overflow: hidden;
  padding: 2px 6px 0px 6px;
}

.thumbnail {
  width: 20vw;
  height: 15vw;
  float: left;
  background-image: url(##native_image##);
  background-size: cover;
}

h1 {
  font-size: 2.125vw;
display: -webkit-box; -webkit-line-clamp: 3; -webkit-box-orient: vertical; overflow: hidden; }

a {
  text-decoration: none;
}

.attribution {
  color: rgba(0, 0, 0, 0.7);
  font-size: 2.25vw;
  font-weight: bold;
  display: inline-block;
  background-color: #ffd724;
  border-radius: 2px;
}
For a Native Horizontal ad (width : height=2 : 1), the HTML code is
<a href="%%CLICK_URL_UNESC%%##hb_native_linkurl##" target="_blank" class="pb-click">
  <div class="card">
  	<div class="container">
    	<div class="container2">
	    	<img src="##hb_native_image##"/>
	  	</div>
  	</div>
  	<div class="container">
    	<div class="title">
	    	<h1>##hb_native_title##</h1>
	  	</div>
	  	<div class="attribution">
	    	<h1>##hb_native_brand##</h1>
	  	</div>
  	</div>
	</div>
</a>
<script src="https://cdn.jsdelivr.net/npm/prebid-universal-creative@latest/dist/native-render.js"></script>
<script>
    var pbNativeTagData = {};
    pbNativeTagData.pubUrl = "%%PATTERN:url%%";
    pbNativeTagData.adId = "%%PATTERN:hb_adid%%";
    // if you're using 'Send All Bids' mode, you should use %%PATTERN:hb_adid_BIDDER%%
    pbNativeTagData.requestAllAssets = true;
    window.pbNativeTag.renderNativeAd(pbNativeTagData);
</script>
The CSS code is
.card { width: 98vw; height: 49vw; border: 1px solid #000000; }

.card::after { content: ""; clear: both; display: table; }

.container { float: left; width: 50%; }

.container2 { display: flex; justify-content: center; align-items: center; height: 49vw; }

img { max-width: 49vw; max-height: 49vw; width: auto; height: auto; }

.title { text-align: center; padding: 10vw 1vw 1vw 1vw; }

.title h1 { line-height: 1.2; display: -webkit-box; -webkit-line-clamp: 5; -webkit-box-orient: vertical; overflow: hidden; font-size: 3.25vw; }

a { text-decoration: none; }

.attribution { color: rgba(0, 0, 0, 0.7); text-align: center; padding: 1vw 1vw 1vw 1vw; }

.attribution h1 { background-color: #ffd724; font-weight: bold; font-size: 3.5vw; display: inline; }
For Native Vertical ad (width : height = 1 : 2), the HTML code is
<a href="%%CLICK_URL_UNESC%%##hb_native_linkurl##" target="_blank" class="pb-click">		<div class="card">
  	<div class="container">
    	<div class="container3">
	    	<img src="##hb_native_image##"/>
	  	</div>
  	</div>
  	<div class="container2">
    	<div class="title">
	    	<h1>##hb_native_title##</h1>
	  	</div>
	  	<div class="attribution">
	    	<h1>##hb_native_brand##</h1>
	  	</div>
  	</div>
	</div>
</a>
<script src="https://cdn.jsdelivr.net/npm/prebid-universal-creative@latest/dist/native-render.js"></script>
<script>
    var pbNativeTagData = {};
    pbNativeTagData.pubUrl = "%%PATTERN:url%%";
    pbNativeTagData.adId = "%%PATTERN:hb_adid%%";
    // if you're using 'Send All Bids' mode, you should use %%PATTERN:hb_adid_BIDDER%%
    pbNativeTagData.requestAllAssets = true;
    window.pbNativeTag.renderNativeAd(pbNativeTagData);
</script>
The CSS code is
.card { width: 98vw; border: 1px solid #000000; }

.container { height: 98vw; text-align: center; vertical-align: middle; }

.container3 { display: flex; justify-content: center; align-items: center; height: 98vw; }

img { max-width: 98vw; max-height: 98vw; width: auto; height: auto; }

.container2 { height: 98vw; display: table-cell; text-align: center; vertical-align: middle; padding: 4px; }

.title h1 { display: -webkit-box; -webkit-line-clamp: 5; -webkit-box-orient: vertical; overflow: hidden; font-size: 6.5vw; }

.attribution { color: rgba(0, 0, 0, 0.7); }

a { text-decoration: none; }

.attribution h1 { background-color: #ffd724; font-weight: bold; font-size: 7vw; display: inline; }
Now, you can define your Order and its Line items in GAM.
In your line item definition, select the formats “native_sqaure”, “native_nature”, “native_horizontal” and “native_vertical” as Expected createives.

And select Ad units “Native square”, “Native horizontal”, “Native nature” and “Native vertical” as targeting inventory.

You can define multiple line items with the same Expected Creatives and targeting Ad units but with different delivery rates ($1.50, $2.00, etc.).
Now, your GAM tags are ready to serve Content-Driven Native Ads. Just hook them up with Adrelevantis Bidder Adapter as described in the previous blogs.
Any questions? Please reach us at info@adrelevantis.com.
To understand what the Content-Driven Advertising is and how it works, please read the following posts:
