Set up standard banners and native ads in Google Ad Manager can be challenging and error prone. Here, I separate these steps into several videos so that you can follow more easily.
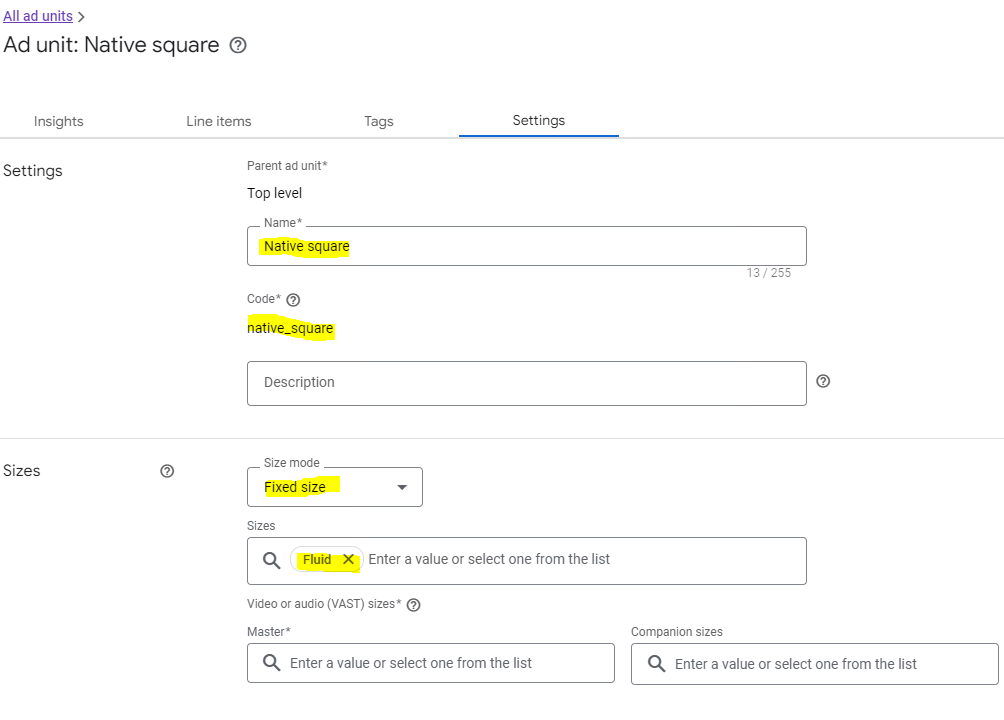
Create an ad unit. This ad unit is for both banner ads and native ads.
2. Create a native style for native ads.
Here is the complete HTML code.
<a href="%%CLICK_URL_UNESC%%##hb_native_linkurl##" target="_blank" class="pb-click">
  <div class="card">
    <div class="title">
        <h1>##hb_native_title##</h1>
    </div>
    <div class="attribution">
        <h1>##hb_native_brand##</h1>
    </div>
    </div>
</a>
<script src="https://cdn.jsdelivr.net/npm/prebid-universal-creative@latest/dist/native-render.js"></script>
<script>
    var pbNativeTagData = {};
    pbNativeTagData.pubUrl = "%%PATTERN:url%%";
    pbNativeTagData.adId = "%%PATTERN:hb_adid%%";
    // if you're using 'Send All Bids' mode, you should use %%PATTERN:hb_adid_BIDDER%%
    pbNativeTagData.requestAllAssets = true;
    window.pbNativeTag.renderNativeAd(pbNativeTagData);
</script>
You want an area of a page to show both standard banner ads and Content-Driven Native ads alternatively based on page views. This can be done in Google Ad Manager. Here, I discuss how to achieve this.
In the adUnits, you specify both banner and native as mediatypes. For banner, you specify the sizes of ads you want to display. In defineSlot function, you need to specify ‘fluid’ (for native ads) and sizes (for banners).
The rest of work is in Google Ad Manager. Let’s say you want to display a 300×250 banner and native square Content-Driven ads alternatively.
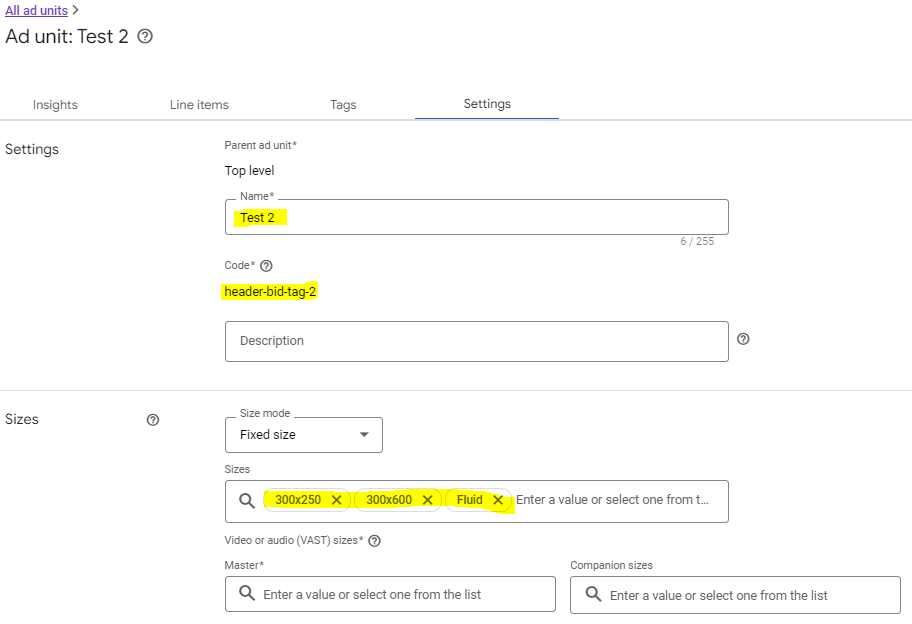
First, you need to define an ad unit. For sizes, you need to select ‘Fluid’ for native ads and possible banner sizes that you want the ad unit to display.
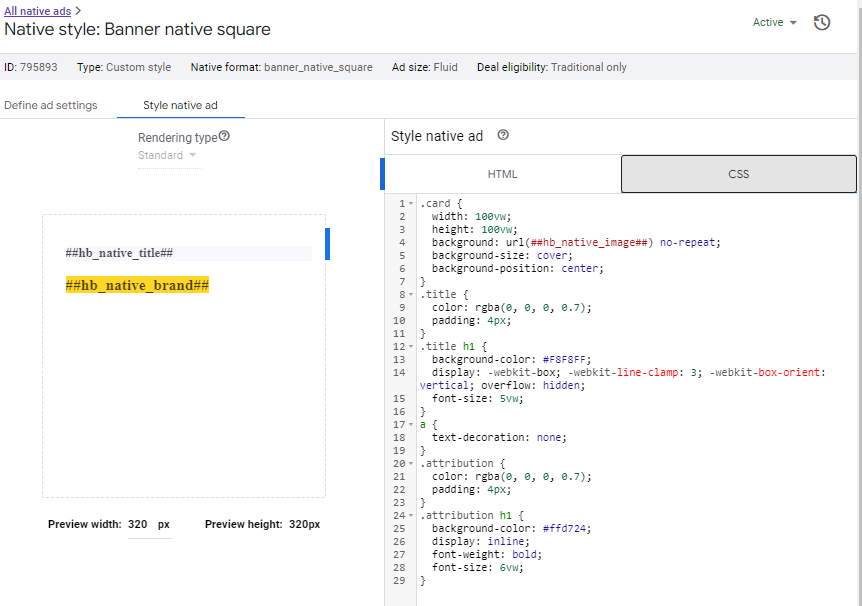
Then, you define a Native. Make sure it targets to the ad unit defined in the previous step (“Test 2” for this case).
You also need to define HTML and CSS of the native.
Here is the complete HTML code.
<a href="%%CLICK_URL_UNESC%%##hb_native_linkurl##" target="_blank" class="pb-click">
  <div class="card">
  	<div class="title">
    	<h1>##hb_native_title##</h1>
  	</div>
  	<div class="attribution">
    	<h1>##hb_native_brand##</h1>
  	</div>
	</div>
</a>
<script src="https://cdn.jsdelivr.net/npm/prebid-universal-creative@latest/dist/native-render.js"></script>
<script>
    var pbNativeTagData = {};
    pbNativeTagData.pubUrl = "%%PATTERN:url%%";
    pbNativeTagData.adId = "%%PATTERN:hb_adid%%";
    // if you're using 'Send All Bids' mode, you should use %%PATTERN:hb_adid_BIDDER%%
    pbNativeTagData.requestAllAssets = true;
    window.pbNativeTag.renderNativeAd(pbNativeTagData);
</script>
Now, you can define your campaign Order and its line items.
You need to define a line item for your banner. Note the Expected creatives is 300×250.
Make sure you target to Inventory “Test 2”.
You also need to define a creative for this line item. For this case, the creative is the banner image, the click through, etc.
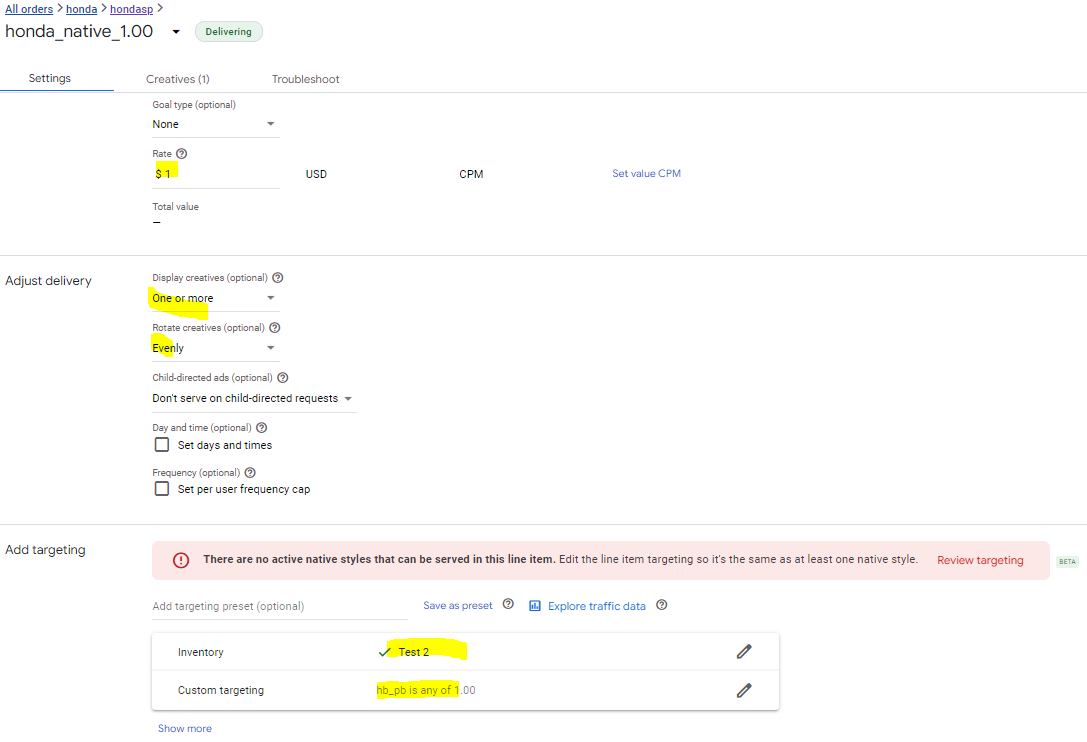
Now, you need to define a second line item for the native ads. Make sure select the previous defined native as Expected creatives (“banner_native_square” for this case).
Make sure select “Test 2” as Inventory targeting.
You are done.
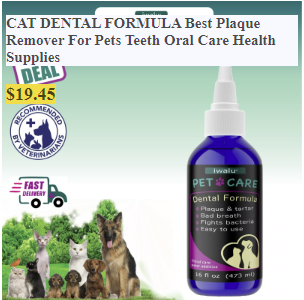
You can click this link to see how it actually works. In general, the banner ad takes precedence. When its impressions are using up, the native ads kick in.
The next step is to move the code into your pages or integrate it with your code base.
Any questions? Please contact us at info@adrelevantis.com.
To understand what the Content-Driven Advertising is and how it works, please read the following posts:
In the previous blogs (Part 1 and Part 2), I discussed how Content-Driven Native Ads work with our GAM tags. In this blog, I show you how to set up your GAM tags to work with Content-Driven Native Ads.
I assume that you use Prebid.js header bidding platform for your site. I presume you have a Google Ad Manager account and have basic understanding of it.
Let’s say you want to display a native ad to fit in a square area of your page.
In Ad units of GAM, add an ad unit as follows. Make sure select Size mode “Fixed size” and Sizes “Fluid”.
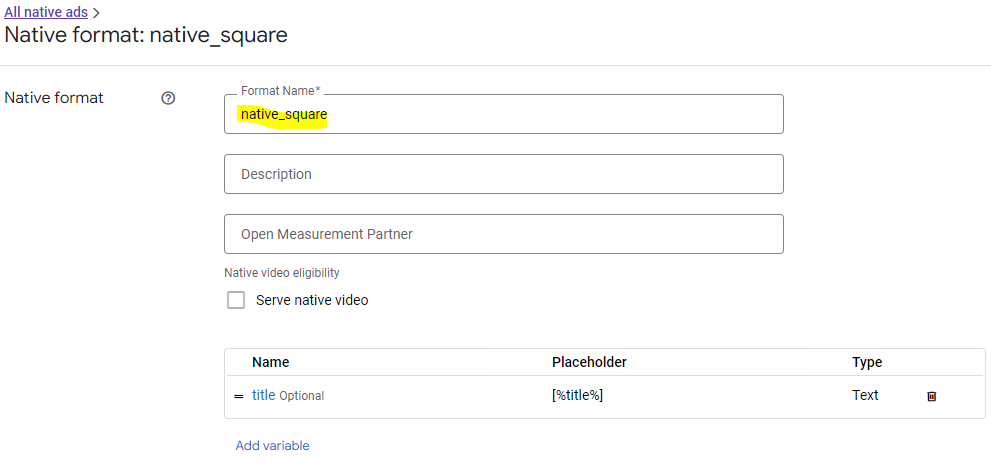
In Native of GAM, add a Native format.
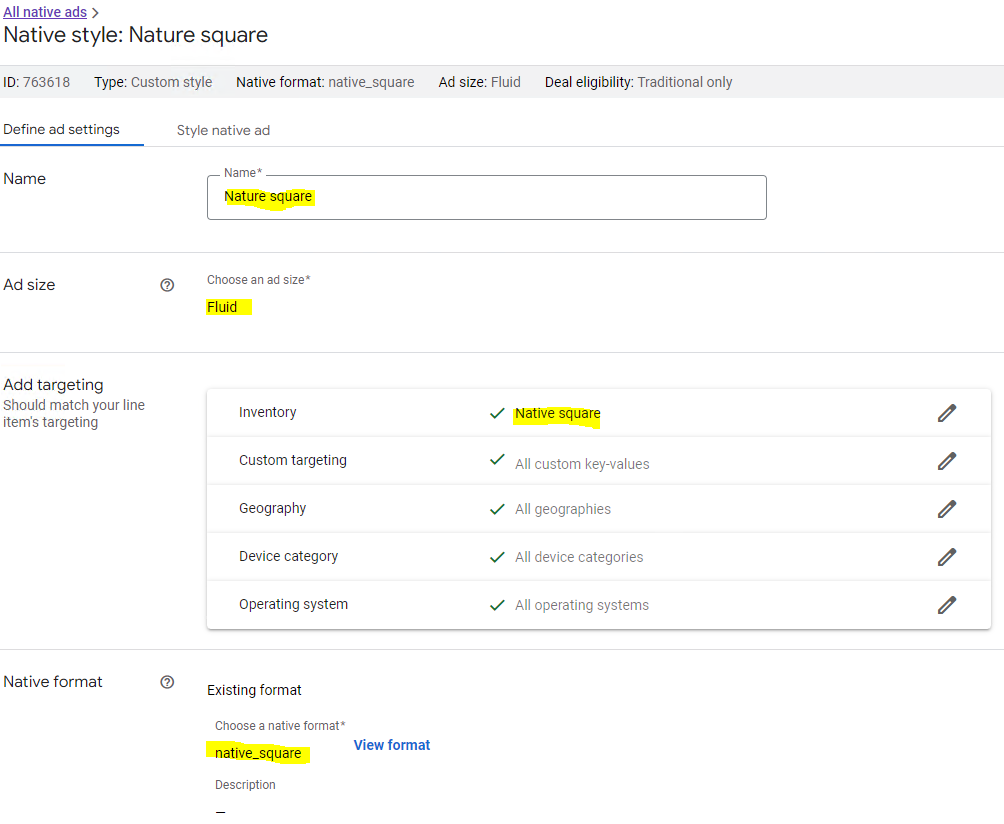
Add a Native style. Make sure choose “Fluid” as an ad size. Select “Native square” ad unit as targeting Inventory. Choose the “native_square” format defined previously.
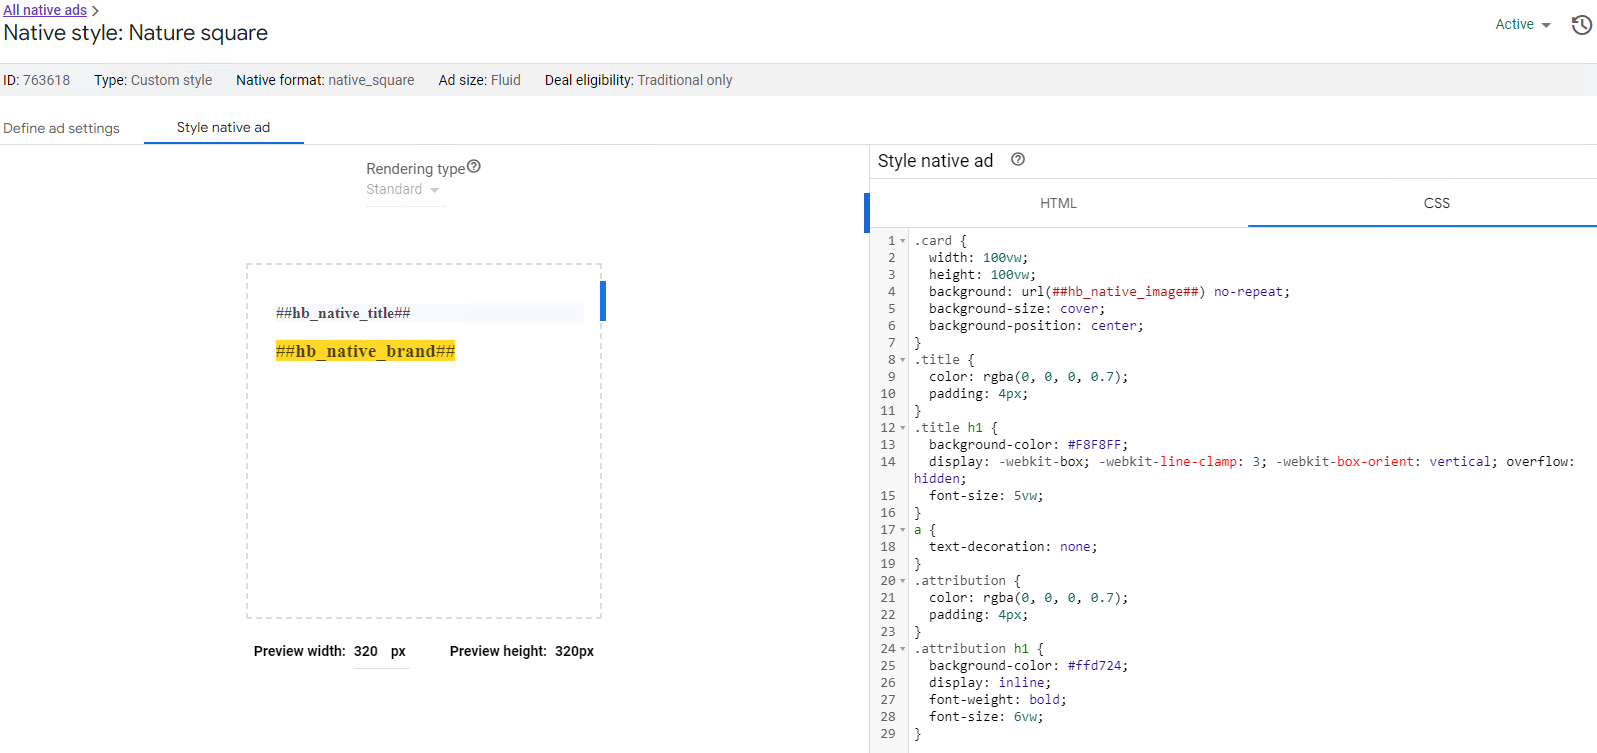
Insert the following code in HTML and CSS of Style native ad tab, respectively.
Here is the complete HTML code.
<a href="%%CLICK_URL_UNESC%%##hb_native_linkurl##" target="_blank" class="pb-click">
  <div class="card">
  	<div class="title">
    	<h1>##hb_native_title##</h1>
  	</div>
  	<div class="attribution">
    	<h1>##hb_native_brand##</h1>
  	</div>
	</div>
</a>
<script src="https://cdn.jsdelivr.net/npm/prebid-universal-creative@latest/dist/native-render.js"></script>
<script>
    var pbNativeTagData = {};
    pbNativeTagData.pubUrl = "%%PATTERN:url%%";
    pbNativeTagData.adId = "%%PATTERN:hb_adid%%";
    // if you're using 'Send All Bids' mode, you should use %%PATTERN:hb_adid_BIDDER%%
    pbNativeTagData.requestAllAssets = true;
    window.pbNativeTag.renderNativeAd(pbNativeTagData);
</script>
In Creatives of GAM, create a creative named “Native square”. Make sure to choose the previously defined format “native_square” as Creative template. Select “Native” as Target ad unit size. And select “jsdelivr” as ad technology provider.
That finishes the definition of the Native Square ad. You can define other ad formats by following the same steps. The only difference is their HTML and CSS code.
For Native Nature format (ads cross the width of content section), the HTML code is
<a href="%%CLICK_URL_UNESC%%##hb_native_linkurl##" target="_blank" class="pb-click">
  <div class="sponsored-post">
  	<div class="thumbnail" style="background-image: url(##hb_native_image##);">
    </div>
  	<div class="content">
    	<h1>##hb_native_title##</h1>
    	<div class="attribution">##hb_native_brand##				</div>
  	</div>
	</div>
</a>
<script src="https://cdn.jsdelivr.net/npm/prebid-universal-creative@latest/dist/native-render.js"></script>
<script>
    var pbNativeTagData = {};
    pbNativeTagData.pubUrl = "%%PATTERN:url%%";
    pbNativeTagData.adId = "%%PATTERN:hb_adid%%";
    // if you're using 'Send All Bids' mode, you should use %%PATTERN:hb_adid_BIDDER%%
    pbNativeTagData.requestAllAssets = true;
    window.pbNativeTag.renderNativeAd(pbNativeTagData);
</script>
Now, you can define your Order and its Line items in GAM.
In your line item definition, select the formats “native_sqaure”, “native_nature”, “native_horizontal” and “native_vertical” as Expected createives.
And select Ad units “Native square”, “Native horizontal”, “Native nature” and “Native vertical” as targeting inventory.
You can define multiple line items with the same Expected Creatives and targeting Ad units but with different delivery rates ($1.50, $2.00, etc.).
Now, your GAM tags are ready to serve Content-Driven Native Ads. Just hook them up with Adrelevantis Bidder Adapter as described in the previous blogs.
Any questions? Please reach us at info@adrelevantis.com.
To understand what the Content-Driven Advertising is and how it works, please read the following posts:
In the previous post, I discussed how to find/display content-relevant native ads by targeting to particular keywords and categories using Googletag. In this post, I’ll show you how to get the keywords and categories of a page automatically in real time when a page is viewed, and then, display relevant native ads using Googletag.
//Content-Driven Advertising needs access to content. So, wait DOMContentLoaded event to start the bid process
document.addEventListener("DOMContentLoaded", function(event){
  //Content-Driven Advertising refers to individual pages
  //Set referrer to no-referrer-when-downgrade to ensure safety while providing page path
  if (document.querySelector('meta[name="referrer"]') === null){
    var meta = document.createElement('meta');
    meta.name = "referrer";
    meta.content = "no-referrer-when-downgrade";
    document.getElementsByTagName('head')[0].appendChild(meta);
  }
  else {
    document.querySelector('meta[name="referrer"]').content = "no-referrer-when-downgrade";
  }

  var q = document.getElementsByTagName('body')[0].innerText;

  var pload = 'q=' + encodeURIComponent(q);
  var h = new XMLHttpRequest();
  h.onreadystatechange = function () {
    if (4 === this.readyState) {
      if (200 === this.status) {
        var res = JSON.parse(this.responseText);
        if (res != null){
          var cats = res["Category"];
          var keywrds = res["Keyword"].replaceAll(/\|/g,",");
          bidFunc(keywrds, cats)
        }
      }
    }
  };
  h.open("POST", "https://api.adrelevantis.com/getcatskeywords", true);
  h.setRequestHeader("Content-type", "application/x-www-form-urlencoded");
  h.send(pload)
});
When DOMContentLoaded is fired, the page content is sent to a web service called “https://api.adrelevantis.com/getcatskeywords“. The web service returns ranked keywords and IAB Categories of the content. The keywords and the categories are passed into bidFunc to start bid.
In summary, here is what happens when a page is viewed. A user opens the page -> At DOMContentLoaded event, the page content is parsed for its keywords and IAB categories -> The keywords and the Categories are sent to the bidder -> The bidder returns a bid that matches the keywords and the categories along with other bid parameters -> The bid is sent to Google Ad Manager for display.
Here are a few live examples. Click them to see native ads that are relevant to their content.
Google Ad Manager has been set up to work with Adrelevantis Bidder Adapter to deliver native ads that are relevant to page content. As a publisher, you just need to use the Google tag to display relevant ads in your pages. In this blog, I will show you how to make a page to display content-relevant ads by providing keywords and IAB Categories for the page.
The function bidFunc(keywrds, cats) has typical Prebid.js code for publishers that works with Googletag. Pay attention to the setBidderConfig that sets keywords and categories for adrelevantis bidder. These keywords and categories are used to match ads. If an ad found and other criteria (geo-location, cpm, etc.) met, a bid is returned. The rest of the code defines ad units, maps the ad units to ad slots of Google Ad Manager, and requests bid.
In this simple example, we hard-coded the comma-separated keywords (“Pets Dental Health,Pet dental”) and the pipe-separated IAB Categories (“/pets|/pets/cats”) for demonstration purpose. If you know the keywords or IAB Categories of a page, or you want to target to particular keywords or categories, you can use this approach. However, it will be more useful if the keywords and categories of a page can be identified automatically when the page is viewed. In next post, I will discuss how an AI service can be used to identify the keywords and categories of a page automatically.
Click the following link to see native ads in this example: native-example.
Contact: info@adrelevantis.com.
To understand what the Content-Driven Advertising is, please read the following post: